Project Development
This section of the site will cover the projects development. Covered here will be the development of the 3D game scenario and its associated assets, development of the survey used for data collection, and any other relevant developments associated with the project.
Section Breakdown
For the sake of clarity this section will be broken down in to three sub-sections detailed below.
Software Overview
A quick overview of the software used will be provided with reasoning for their usage during the project.
Approach to Development
My broad approach to developing mechanics and assets will be outlined here to give insight into my work.
Game Scenario Review
Specific 3D game scenario assets and mechanics will be reviewed here alongside the steps taken to create them.
Software Overview
Covered here are the software and websites I utilised in the practical portions of the research projects development.
Unreal Engine 5
The game engine of choice during the development of the 3D first-person game scenario was the Unreal Engine (Epic Games 2022a). I have a wealth of experience with Unreal Engine and I feel its use is necessary to both further develop my own personal skills and to produce the quality of product required to conduct this research project.

Substance 3D Painter
Substance 3D Painter (Adobe 2023) has been used a great deal during this project in conjunction with Quixel Mixer (Epic Games 2022b) to texture all assets made in Maya. Many of the early assets like walls and floors were developed with Quixel Mixer (Epic Games 2022b). However, most of the complex multi-material textures were created using Substance 3D Painter as its interface and tools are slightly more advanced in comparison (Stylised Station 2021).
Photoshop
Photoshop (Adobe 2020) is an image processor/ editor I have employed a few times throughout the project for various different tasks. The primary uses for Photoshop were the creation of material ID maps for a few assets, decals needed for certain objects in the 3D game scenario, and early concept designs for levels.
Autodesk Maya
Autodesk Maya (Autodesk 2021) was the modelling software used during this production. I had initially planned to utilise both Maya and Blender (Blender Foundation 2022). However, early experiments with Blender left me with less than desirable assets. In addition to this, file formatting was slightly different for the project files which would have lead to a more confusing production cycle. Because of this, I decided to solely use Maya as I am far more experienced with it.
Mixer
Mixer (Epic Games 2022b) was the other texturing software utilised, mostly during the initial phase of the project. Due to my experience with mixer and the necessity of having some assets in the scene prior to the pilot test I utilised mixer for many of the early assets. This was primarily done as I was unused to the workflow involved with Substance 3D Painter initially and had to quickly produce and implement these assets into the pilot test scene.
_svg.png)
Microsoft Forms
Microsoft Forms (Microsoft 2016) is survey software that was used to create the survey employed alongside the scenario to gather relevant data. Microsoft Forms was initially dropped in favour of Jotform (Jotform Inc 2006) for the pilot test because of a problem during testing detailed in the testing and experimentation page. However, following the revelation participants were able to give informed consent via Microsoft Forms and the headache of formatting data exported from Jotform, I decided to make the move back to Microsoft Forms for the final test.
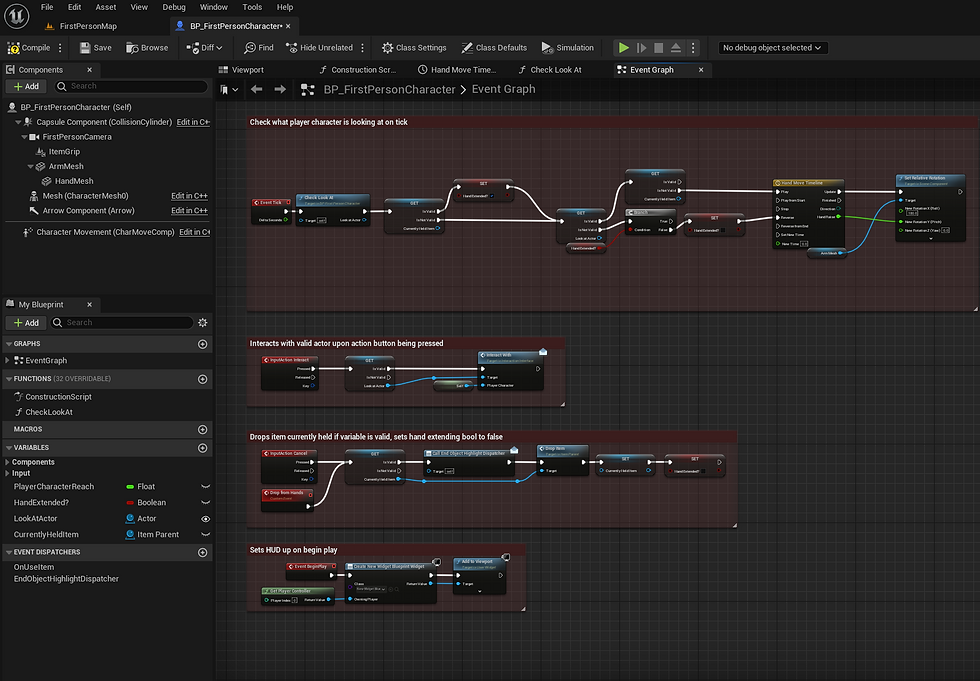
Approach to Development
Before covering the mechanics and assets currently in the 3D scenario, I think its important to cover my broad approach to these things. This will begin with a rough overview the game development software mentioned above, and then steps taken in using the other sites & software like Microsoft Forms (Microsoft 2016) and Photoshop (Adobe 2020).
Unreal Engine 5

Very early testing in the dev level for the diegetic puzzles

Very early testing in the dev level for the diegetic puzzles

Updated version of the complex diegetic puzzle for the pilot test
Very early testing in the dev level for the diegetic puzzles
When beginning in Unreal (Epic Games 2022a) I chose to base the project on their 1st Person template. This template features a player character with a full range of motion and camera attached already, saving me the hassle developing one myself to accomplish essentially the same task. In addition to this, the default map featured is perfect for me to test mechanics' functions prior to implementation into the levels. Prior to any development step I also set up a file structure for easier organization when working. When actually developing mechanics in the Unreal Engine I have been using the blueprints visual scripting system that is part of Unreal. I am fairly experienced with the use of blueprints and their interface, which is one of the core reasons for my use of them. Whilst I could have utilised C++ for this project, I have barley any experience in its usage. In addition to this, when considering the time I have available and the scope of the game scenario I'm aiming to create, its usage does not seem necessary when I'm far more comfortable with using blueprints. When developing specific mechanics, materials, interfaces, etc. in the blueprint editor, I have strived to keep the formatting of the nodes simple and uniform so they're easier to read if I need to make changes post creation. Where possible, I gave tried to ensure the mechanics I have made are as modular and reusable as possible. This ensures I can make use of them at multiple points in the levels far easier, and also gives me the opportunity to export them out from the project for use at a later date if necessary. The gallery above features screenshots from the 3D game scenario's Unreal Engine editor files to try and give visuals to some of the points brought up here.
Autodesk Maya

Primitive cylinder and cube used in box modelling process

Smoothing of hard edges and the removal of triangles on the cylinder

Demonstrating export settings and naming conventions for exported assets
Primitive cylinder and cube used in box modelling process
Prior to any kind of modelling or UV unwrapping in Maya (Autodesk 2021), I ensure I have created and set a new project associated with what I am doing to make the organization and navigation of the files created easier. When the project is set, I will create a new scene and add primitive shapes to it that have the rough dimensions of the object I am aiming to create. The method of modelling I most often use is called box modelling. This form of modelling involves using primitive shapes as a base for the asset you intend to create and building from them (Arsalan 2021). When I have what I need in the scene I will scale the shapes and extrude portions of them according to what I believe I need. This will often be done with a reference image in the scene or on my second monitor so I have some frame of reference for what it is I intend to create. When I'm happy with the rough shape of the asset I will begin adding detail and refining what I've already made, ensuring I avoid hard edges and guaranteeing I am only utilising 4 sided faces as anything more or less will disrupt flat faces and look unpleasant when rendered (Pluralsight 2014). When the asset is finished being modelled I utilised the Maya UV editor to correctly position and scale UV maps ready for texturing. When an asset was textured I would need to create a material ID map for use in the texturing software. In order to do this I made sure that the faces on the assets were assigned specific materials based on what material I needed that portion of the asset to display. So if I wanted the handle of the lever asset to be wood and the base of it to be metallic, I needed to make sure these areas were two distinct materials with different colours in Maya. When the materials were defined correctly I would utilise the transfer mapping tool within Maya. The mesh with the colours assigned would be the source mesh, and another single material duplicate of the asset would be the target. By doing this, the material ID of the mesh would be projected onto a 2D material ID map that could be used to define where specific materials go in the texturing software.
When I had completed an asset and prepped it for being textured, I would export the asset as a .FBX for importation into the differing texturing software and the Unreal Engine. FBX models are widely recognized across a range of different software, including all those used during this production. The steps outlined here are demonstrate more concisely in the gallery above.
Substance 3D Painter

Setting up the project files in Substance

Viewing the asset in the Substance and baking the material ID map

How the asset looks in the scene when the textures are finished and exported from Substance into the Unreal Engine
Setting up the project files in Substance
Work in Substance 3D Painter has been done fairly simply for this project. Assets developed in Maya (Autodesk 2021) have been imported into a new scene in Substance and had the material ID map made in Maya or Photoshop (Adobe 2020) applied and baked onto them. When the material ID map was applied I began placing materials onto specific sections of the asset thanks to the control afforded to me by the material ID map. I chose materials for the assets based on the aesthetic I was going for with the overall project. I did not want or need the assets to be of incredible quality, I just needed them to look relatively realistic and share a similar art style. This was primarily to avoid a change or clash in style affecting participant immersion when they were taking part in the test which could the negatively affect the data acquired (Cook 2008). Substance 3D Painter provides a wide array of variables you can change with your set materials. This allowed me to fine tune the colouring and detailing on specific assets, like editing to cracks on the surface of a concrete texture or its changing its hue to be in line with the rest of the asset. When happy with the look of an asset in Substance, I would extract it out using the Unreal Engine extract template so I had 3 separate texture maps: a colour map for the actual colour of the asset, and RMA (roughness, metalness, and occlusion) map for further detailing, and a normal map to simulate depth without using real faces.
Quixel Mixer

Importation of mesh and material ID map

Applying different textures onto the asset

Demonstrating the export settings from Mixer
Importation of mesh and material ID map
With the benefit of hindsight, I can see that my workflow in Quixel Mixer (Epic Games 2022b) was essentially the exact same as Substance 3D Painter. As such I won't dedicate to much time to it here, but I essentially imported my untextured meshes in, applied their material ID map, and then applied material ID masks to any textures I applied onto the mesh to ensure they only covered the regions I needed them to cover. I exported these textures using the same export settings I used in Substance for easy importation into Unreal Engine (Epic Games 2022a).
Photoshop

UV Map imported into Photoshop

Build up of colours per different material and their position on the mesh

Demonstration of what the material ID map looks like in Substance 3D Painter
UV Map imported into Photoshop
Photoshop (Adobe 2020) was used a couple of times during the project. The majority of its use was dedicated to developing a couple of material ID maps when the ones made in Maya (Autodesk 2021) were not useable, often down to seams in the textures caused by Maya not making hard blocks of colour and trying to blend the edges. These material ID maps were created by placing block colours over certain portions of a meshes UV map in order to specify what faces should have a material projected onto them.
Microsoft Forms


Microsoft Forms (Microsoft Corporation 2016) became the survey hosting website of choice following my poor experience with Jotform (Jotform Inc 2006) formatting. The survey developed to be completed following the gameplay was structured identically to the pilot test survey. Microsoft Forms tools like the standard choice boxes were used at the start so participants could give their consent and provide information about themselves, and following this likert style nodes were used to adapt the GEQ (IJsselsteijn, De Kort and Poels 2013) for usage on forms. Comment boxes were also utilised at the end of the survey to gather a small amount of qualitative data for use in comparison to the quantitative, alongside also collecting any information regarding technical errors that may have occurred.
3D Game Scenario Construction
This portion of the development section will focus on the construction of the 3D game scenario. This will primarily cover the mechanics being used and the construction of the environment within the 3D game scenario.
3D Game Mechanics
Interaction System
Simple Diegetic Puzzle


Complex Diegetic Puzzle


Simple & Complex Non-Diegetic Puzzle


Non-Diegetic Signpost

The mechanics of the game scenario are fundamental parts of the games overall construction. Their importance is only further emphasised by the fact that their smooth integration and usage is critical to gathering sound data.
The interaction system utilised is an adapted version of an old tutorial posted to YouTube by Ryan Laley (2020). My version of the interaction system implements many changes to the original, it features
-
A completely revamped item dropping system to avoid unwanted clipping of objects
-
A new diegetic and non-diegetic highlighting system
-
Added Functionality to a wider range of objects like the levers
The simple diegetic puzzle consists of players placing ingots or gems on corresponding pressure pads. These pressure pads include both icon and indication signposting in a diegetic manner. The puzzle will flip a board with another diegetic indication on it representing when the pressure pad has the correct item on it. This mechanic is fairly simple - the pressure pad is a collision box waiting for its publicly reference actor to overlap it. When it does this it sets its complete state to true. If the item is removed the indicator is flipped back and its completed state is set to false.
The complex diegetic puzzle involved participants pushing blocks on a platform to position them in their allocated positions. These positions are again signposted in the form of diegetic indications and icons. This mechanic is a bit more complex script wise. It essentially involves players using the interaction system on certain handles that then communicate with the block to trigger a push command. Depending on the handle that communicates with the block, the block will move in a specific direction. The bounds of the puzzle are small cubes positioned at intervals around the edge of the play area. By doing this, I am able to position them how I like to customize the puzzle. The blocks invisibly overlap with these cubes and the other blocks which then tells them that their way is blocked where the overlap has taken place, preventing them from moving. The puzzle is complete when the blocks are positioned right by the player. Indicators above the door will demonstrate when the correct positioning has been achieved and the door will be unlocked upon completion.
6th of March 2023
The simple and complex non-diegetic puzzles task players to match non-diegetic icons via levers to icons on their associated doors. Non-diegetic indications show players when they are able to interact with the levers, and the icons on the levers change as they are interacted with. The simple puzzle only implements a single door. In contrast to this, the complex puzzle features two separate doors, and each ones associated levers are missing one of their handles. These levers require players to locate the handles associated with them, indicated by a non-diegetic icon above them. This system works by having the levers communicate their status with a controller. Each time the controller is contacted it runs an event that checks if the statuses are correct and then tells its publicly referenced door what to do.
3rd of April 2023
Considering some issues players had during the pilot test, I have decided to modify the method of viewing the correct symbol order somewhat. With the new method, a separate notice board with an attached particle effect denotes the correct states of the levers, instead of the door. The door had no non-diegetic indicator that would imply it held the correct symbol combination, and as such participants would only find it by chance. With the new system, a non-diegetic indication is utilised in the form of floating particles, implying participants should inspect it. This was easily done as all of the same code from the door was retained to make the symbols appear on the new notice board instead of the door, all that was necessary to change was the symbols world position, and utilise a basic Niagara particle system template found in Unreal (Epic Games 2022a). These changes are better visualised by watching the provided videos.
Both levels feature some form of signpost trying to direct participants to the complex puzzle following participants completion of the simple puzzle. For the diegetic level this is a simple signpost mesh, whereas for the non-diegetic signpost required a blueprint to be made. This blueprint is essentially a carbon copy of the non-diegetic notice board, however the icon has been changed slightly and the mesh is different.